On-Line Manual
Bookmarks
Work
Order assignmet
Client assignment
Stock
assignment
Client Vehicle Invoice Accounts Ledger Parts Orders Utilities Docket Workshop
Receipting Entries:
When parts or services are delivered, the specific items on the Purchase Order which was initially created to obtain the parts or services must be "receipted". Load the Purchase Order by selecting Orders from the Main Menu and choosing any of the load methods.
At this point, as you now have the supplier's invoice to hand, it is a good opportunity to update parts prices in the parts libraries with the new prices etc if required. Select an item in the Purchase Order and click the Edit Library Part control to update the parts files.
When
an item is selected in the Purchase Order, click the Receipt Entry control
or double click the entry to commence "receipting"
the item. The receipting process is dependant on the selected item's
assignment.
Receipting
Work Order assigned
items:
If the selected item you intend
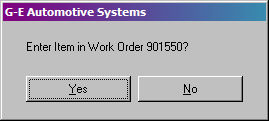
to receipt has "work order" assignment, G-E asks if you
wish to add the item to the work order to which the item was originally
assigned:
 Select
Yes to have G-E automatically enter the item in the work order.
G-E will enter the item using the current price in the item's part
file x the quantity of the order. (Ensure the prices are current). G-E then offers
the option to view the updated work order.
Select
No to receipt the item without adding it to the work order.
Note:
After
receipting an item, G-E places an "R" in the "Rec"
column of the Purchase Order to indicate the "receipted"
status.
If you choose No to the dialogue, G-E will simply mark
the item as receipted and perform no further action. You must enter
the part into the work order using the normal method of adding parts
to work orders.
A receipted item can be "unreceipted"
by selecting the item and clicking the Receipt Entry control
again or double clicking the entry again. If the item was added
to the work order, unreceipting the entry will NOT remove the
item from the work order. G-E warns you of this with a message.
You must load the work order using the "View Work Order"
control on the Purchase Order window or from the Invoice menu and remove the
item if need be.
A work order cannot be finalised if any purchase
order contains items assigned to it. You must either receipt the
items, reassign the items, cancel the items or delete the items
from the outstanding purchase orders before the work order can be
finalised.
Receipting
Client assigned
items:
Client assigned items cannot
be receipted. A client assigned item must be reassigned to a work
order or stock before it can be receipted. This ensures the client
is always eventually charged for the item or the item is correctly
accounted for in the inventory.
If any purchase order contains
a client assigned item, G-E reminds you of the assigned items whenever
a work order to the assigned client is finalised.
Receipting
Stock assigned
items:
Stock assigned items are
tied to the Inventory. (See Inventory in the Workshop menu).
To
receipt a stock assigned item, select the entry in the purchase
order and click the Receipt Entry control or double click the
entry in the list. G-E presents the "Update Inventory"
request:

Select
No to receipt the entry and apply no further action. Select Cancel
to close the dialogue without making any changes.
Select Yes
to update the inventory.
If you select Yes to update
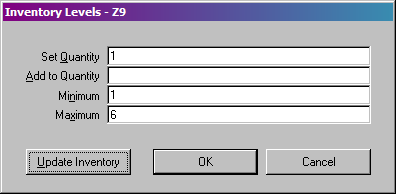
the inventory, G-E presents the "Inventory Levels" dialogue:

The Inventory Levels dialogue presents the part's levels as they stand in the inventory at the current moment.
The Set
Quantity is the
current quantity of the item in stock before adding the stock
being receipted in the purchase order. This figure can be changed
to show the correct quantity in stock at the current moment should
a physical count reveal a change needs to be made. The number of
the item being added to stock need not be entered in the "Add
to Quantity" field. G-E already knows this number and will
do the maths for you.
The Minimum
and Maximum figures are the set levels for the item as they were
entered when the part was added to the inventory. These figures
can also be adjusted here if required.
If you are happy with
the displayed quantities, select Ok or press Enter to complete the
receipting process and update the inventory without further confirmation.
G-E adds the quantity of the item on the purchase order to the displayed
inventory quantity and updates the inventory with the new total.
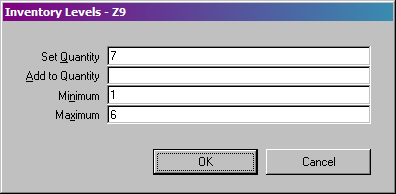
The Update Inventory control updates the information and presents
the Inventory Levels dialogue again with the updated information:

G-E
has now added the quantity of the item as entered in the purchase
order to the previous Quantity figure. Once again, any figure can
still be altered here. Select Ok or press Enter to complete the
update. The Inventory is then updated with the new figures.
Note:
If
the Stock assigned item has not yet been added to the inventory,
G-E displays the Update Inventory dialogue with empty fields.
Fill the fields with the appropriate figures (See Workshop >
Inventory for details). Bear in mind that G-E will add the purchase
order quantity to the Inventory Levels quantity on completion of
receipting the entry.
G-E will automatically create the new entry
in the Inventory using the part code and description as entered
in the part's file and set the minimum and maximum levels with the
figures entered in the above Inventory Levels dialogue.
Receipting
Items
Load Order / Client
Load Order / PO
Load
Order / Date
Load Order / Supplier
Load Outstanding Order / Client
Load
Outstanding Order / PO
