On-Line Manual
Bookmarks
Client Vehicle Invoice Accounts Ledger Parts Orders Utilities Docket Workshop
G-E has the provision to print a company logo on all printouts. If selected,
the logo prints to the left of the header details on printouts. (Invoices,
statements etc.)
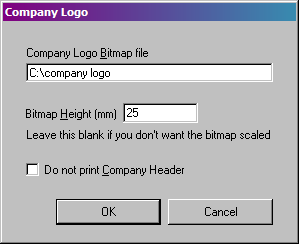
To show your logo on printouts, select Workshop from the Main Menu. Select Company
Logo from the drop down menu. The Company Logo dialogue is displayed.

Enter the path to the logo file in
the Company Logo Bitmap file field. Click Ok
to set the path. If you wish to turn the logo utility off, delete the file
path. Enter the height of the logo in the Bitmap Height (mm)
field. This is required if you use different printers set to different
resolutions or to resize the logo in general to suit the printouts. The Do not print Company Header check
box is used
if you wish to suppress the header printing on all printouts. This includes
invoices, statements etc. If you prefer to use your own stationary with your own
header, check the box.
Note:
The logo image must be .bmp format.
Tip:
Do not store the logo in the geauto directory.
G-E will assume the logo to be part of the graphics library and display the logo
as a library image.
Although G-E will print a colour logo in colour (if
your printer supports colour printing), greyscale images print faster and cost
less to print.
Register Program
Company Details
Company
Logo
Print Letterhead
New Letter
Load
Letter
Turnover
Monthly Statistics
Technicians
Performance
